The environment is no longer a luxury but a necessity. In fact, we can’t keep on conducting business as usual anymore. We have to make sure that we take care of the Earth and its natural resources. Therefore, you need to consider being more conscious about your daily activities. One way of helping the Earth is by switching from flush toilets to composting ones. It’s not as complicated as it sounds but it does require some patience and perseverance in order for you to master the art of composting toilets. If you are still clueless about composting toilet systems, then don’t worry because we will share with you the best DIY Composting Toilet Ideas that you can apply in your home.
DIY Composting Toilet Ideas

Here are 15 DIY Composting Toilet Ideas for you to start building your own! You can find a lot of helpful tips on how to use the composting toilet. These DIY composting toilet ideas will help you start saving your water and energy today. Composting toilets are environmentally friendly alternatives to flush toilets. They reduce your household wastewater and save you money on water bills and can even help you grow your own food. Whether they are at home or in a public place, composting toilets have become more popular. If you’d like to have one at home, start scrolling and choose a design that will suit your budget and needs!
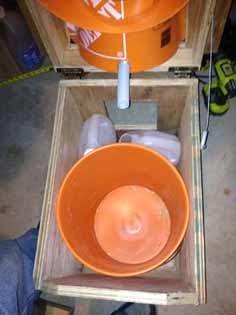
Simplest Composting Toilet
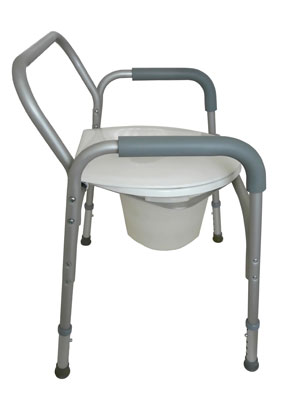
Composting toilets are a great alternative to septic systems, but can be a challenge to set up and maintain. This composting toilet is pretty easy to build and use. It's basically just a modified version of the standard 5-gallon bucket toilet with one important addition: a ventilation pipe that allows air in from the outside. When using this toilet, you simply add a mixture of sawdust and peat moss to the bucket every time you use it. Over time, this mixture will break down into compost, which you can then use as fertilizer for your plants.
Composting toilets are ideal if you live in an area where building a septic system is difficult or impossible. They're also more environmentally friendly than flush toilets because they don't require water or chemicals to work, and they'll never run out of capacity.
Old-School Compost Toilet
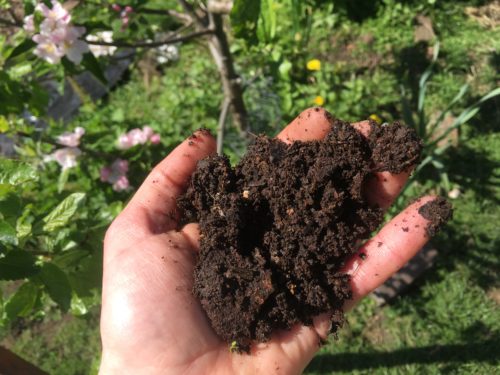
The composting toilet is an old-school sanitation system that people have been using in the past. It is fully functional with no need to connect it to any water supply. The only thing you'll get is a stinky smell, so you'll need to handle it properly.
The first task is to make everything ready, which includes covering the faces with smaller chips of dry, old leaves right inside the bucket. Then you have to find a suitable place to bury the solids in the ground, far from the house & water sources. Once it's buried, cover it up with a layer of soil or sand and add some organic stuff like peat moss or sawdust on top. Use your shovel for digging and cover it all back into its original spot where you have buried the wastes. And that's about all you need to do with composting toilets.
No-Flush Compost Toilet
Building a no-flush composting toilet doesn't have to be a complicated project. You can build one that is easy and affordable, and in some cases, even free. If you are thinking about building one, though, make sure you read up on it first to avoid problems. The most important consideration is how much space you have available for the toilet. It will need a certain amount of room to keep from smelling up your house or offending people who visit. If you don't have room for it where it needs to go, consider putting it in an outbuilding or separate shed.
You also need to consider whether there is an adequate supply of airflow around the toilet. This can be accomplished with a fan or several strategically placed holes in the walls. A composting toilet works best when there is good airflow around it to keep odors away from the house and keep the compost from overheating. Another important consideration is where you are going to get your composting material from. If you live close enough to your garden, you can use this manure as composting material. Otherwise, you will need to buy compost or find some other source of material that can be used as a fertilizer after being composted in the toilet.
Wheelie Bin Compost Toilet
A wheelie bin composter is a great DIY project that can turn your household waste and organic matter into nutrient-rich soil in just two weeks! Wheelie bin composting is a simple and effective way to recycle your household waste and create beautiful, nutrient-rich soil. With a few scraps of wood, wire, and some high-quality compost, you can create a mini garden right in your own backyard.
With this guide, you will learn how to make a DIY wheelie bin composter with easy-to-follow step-by-step instructions. You can easily implement the project regardless of your budget, potential health risk, luxurious time, or tedious labor. The project requires 13 simple steps to complete. This video covers everything onscreen, revealing the necessary facts to hold the task. Moreover, the demonstration remains friendly with simple words for every explained step. And the final video segment even depicts practical uses of the dried soil on plants.
End Table Compost Toilet
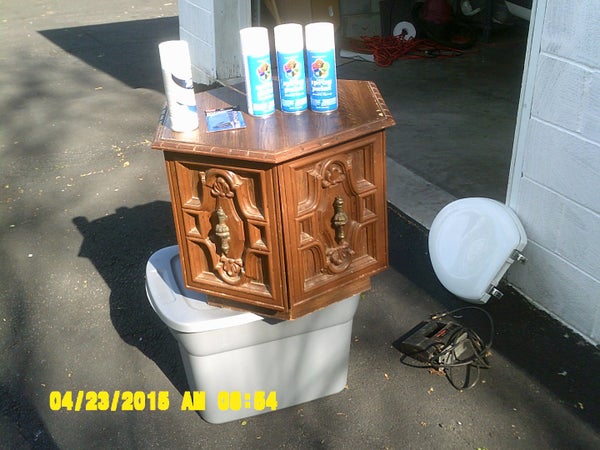
A homemade composting toilet is a viable alternative to traditional flush toilets. There are different designs out there, with varying levels of complexity and function. You can use all sorts of materials for your toilet, including pallets, plywood, and so on. However, this DIY project will show you how to make a composting toilet by using an end table.
It is essential to remove everything not related to the essential framework. Start by cutting off the legs of the end table. Then, connect three wooden blocks together in the same way you did with the legs. Put the three pieces together and fasten them with screws or nails.
Tissue paper or foam rubber can be used as an insulation layer if necessary. It is recommended to place it around the bucket before putting it on the lid so that it can create an air-tight seal when compressed between two surfaces. The last step is to attach a handle for convenience in moving your homemade composting toilet from one location to another. This will prevent unnecessary spillage of waste during transportation.
Tiny Indoor Compost Toilet

Tiny House Compost Toilet is an easy-to-install, sustainable and convenient alternative to existing toilets. The system uses nature’s own processes to transform human waste into useful fertilizer. The structure has units for holding incoming waste as well as a bin to hold the finished product. Overall, the design is very simple, yet effective and stylish.
The advantages of this type of composting toilet · include Low-cost · No electricity required· No water required· Easy installation· No smell· Safe for pets and children· Can be used in any season. Above all, it’s environmentally friendly because you’re using natural processes to convert your waste into fertilizer instead of throwing it away in a landfill where it will leach into the groundwater and create pollution. So once you install this toilet, you can just forget about your waste carefree!
RV Compost Toilet from Scratch
Composting a toilet system is among the best decisions you may make. If you’re planning to move into an RV and live on the go, this is one of the most convenient ways to take care of your waste. To start, you will need a plastic 5-gallon bucket, as well as a couple of 1-gallon jugs. It’s also important to have a drill or some way to puncture holes in the bottom of the bucket. This is where the waste will go once it has been collected. You should also have some type of mesh bag that can be placed at the bottom of your bucket. This is really just something to keep it from being too gross and make cleaning easier for you.
Detailed Toilet Facilitation
A majority of homes use the standard toilet for their bathroom needs. Yet, there are some who find it to be inconvenient. There are many reasons for that, but the simplest is finding it hard to clean. But why would you clean it every day? You can solve that problem by building your own toilet instead of your present one. This article will provide you with detailed steps on how to build your own toilet from scratch. The materials you need and the tools needed for this project will also be enumerated in this article for your convenience. So, in this article, we have listed down some tips that will help you make your toilet without taking help from anyone else.
Waste Separating Bucket Toilet
There are a lot of enthusiasts in the world that grow a fascination with homesteading or spending more time outdoors. However, most of them run into the same problem: how to build a proper composting toilet? It’s not the most basic of projects, and while there are some easy models, they usually don’t have a lot of space. Here’s a great blog post that shows you step-by-step how to build your own composting toilet using 5-gallon buckets. This is a great option for anyone who wants to create a way to dispose of human waste without having to deal with the mess and smell of it.
Do-It-Yourself Compost Toilet

Trying to figure out all the steps involved in constructing a composting toilet at home? Great! This article will guide you through the entire process with lots of useful information that can help you get started. A self-sustaining composting toilet is an excellent choice for those who want to cut down on their water usage, save money and do something good for the environment. You will also be able to use it in any situation – camping, RV traveling, and even during an emergency.
The most important thing is to choose the design that suits your needs best, considering current space and budget limitations. Otherwise, you can try to build one yourself using common household items. Even if you don’t have much experience with DIY projects, this composting toilet is ideal for beginners because of its simple design and easy assembly process. Moreover, it won’t take long before you are ready to use your new eco-friendly toilet!
11. Composting Toilet on Wheels
For people who are looking to establish a self-sustainable living, a composting toilet is a viable option. The study of self-sustaining communities has proven that this system can come in extremely handy. A self-contained composting toilet is a complete bathroom solution with all the needed facilities, designed to work without any plumbing or water supply. The concept is so popular nowadays that there are numerous DIY tutorials available online for those who would like to try their own hand at this project. The video demonstrates how to build one out of wooden boards, using simple tools and resources.
Homemade Composting Toilet

Whatever your situation is, composting toilets sounds like the right choice for you. You’ll be able to handle the business without the help of a septic tank, water supply, or sewer. You can set up your toilet anywhere and don’t have to worry about any inconvenience from it. All you need to do is just find a place where you can keep the container and add on the materials for composting. When it comes to choosing one that is easy to install and convenient to use, a homemade composting toilet will always be the way out. The instructions of this Homemade Composting Toilet project are easy and direct, with little to no complication involved in every step.
Blue Barrel Composting Toilet

Composting toilets are a great alternative to the usual septic tank system. Here is a look at how they work and how you can make one on your own. Composting toilets are used to dispose of human waste without using water and chemicals. You can find them in homes, cabins, cabooses, boats, trains, cars, buses, and even airplanes. Pretty much anywhere you can find people or animals, you can find a composting toilet!
Though the idea may look ordinary, only a few ideas can match its functionality. The tutorial contains some necessary information rather than the implementing steps. You’ll have to look into the integrated video with commentary for getting the specs. The included image showing the basic design looks appealing, detailed & completely useful It’s essential to watch the dynamic motion closely to figure out all the supporting facts. Coming to the article, there are some pro tips on homemade composting toilets.
Vermicomposting Flush Toilet
Vermicomposting flush toilet is one of the most affordable eco-friendly composting toilets. Actually, all it requires is a toilet seat, a bucket to hold the poo, and a separate container for worms. The name comes from the word “vermicompost” meaning compost created by worms. The toilet can be used in any part of the world because it’s not connected to water supply, drainage, or electricity. The natural process relies on household trash and worms to manage human excrement.
As you might have guessed, the vermicomposting toilet does not have a flushing system. The waste is collected in a bucket and removed for processing elsewhere. However, it's recommended to place the bucket under the toilet seat so that no smell emanates from the area. The bucket should be left outside with the lid closed after every use. In this way, you can transport your waste without odor as well as maintain privacy while using the bathroom.
Toilet with Septic Tank

In this particular case, the septic tank is an integral part of the toilet. And it’s pretty much essential for any type of structure. To avoid extra expenses, you can still build your own DIY septic tank. It’ll be a scaled-down version with limited capabilities but enough to manage the liquid waste. The project specifically features a drum septic tank, which serves a small purpose. The process comprises four individual parts and should take you no longer than 3 days to complete. All the cartoonish pictures will help you understand every step without missing any point.