DIY Puzzle Ideas are exciting and fun to play at the same time; they can help your brain develop more. They're a great way to keep our kids from being couch potatoes. Encourage them to do outdoor activities and allow them to have fun by engaging in the creative construction of things. This is highly educated in the sense that it will enhance their memory skills, boost their ability in problem-solving and improve their spatial intelligence as well. Puzzles that are made of wood have a great advantage over those that are made of plastic or cardboard. It is because wood is more durable and can last a lifetime. When it comes to children’s toys, they should be durable and able to withstand hard impacts just in case they fall or drop them accidentally.
We have collected 19 different types of DIY Puzzle Ideas that you will fall in love with, some of them may be new to you but we assure you that it is worth trying them out. They are also a great way for parents to engage themselves with their kids and have fun through constructive DIY activities. In the below tutorials, you will be able to make puzzles on your own to suit your preferences. Play this unique math game with your kids and have fun together. So, let’s get started!

Coaster Trivet DIY Puzzle
There are many DIY puzzles you can create that make use of wood pieces. They also make cool coasters! One design is the Trivet DIY Puzzle. You need glue, sandpaper, plywood, and a jigsaw. First, print out the puzzle template, cut each paper puzzle piece, and attach it to the plywood using a glue stick. Now cut the puzzles out with a jigsaw, sand them, and finish them. Follow along with these steps and you’ll have four beautiful coasters in no time.
Friendship Necklace Puzzle DIY
Be a friend with this easy DIY. All you need is two necklace chains, paint, paintbrushes, push pins, and two puzzle pieces to make this craft. Using the paint you will create a watch-inspired pattern on the puzzle piece. Once that is done, you need to make a small hole in the puzzle to make space for the chain. Mixing both chains gives you that chic look. This is the perfect accessory for you or your best friends.
Wooden Centrifugal Puzzle DIY
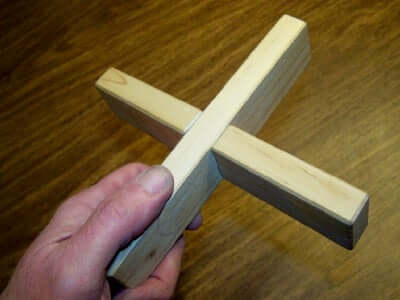
Lose hours of fun as you try to master this wooden puzzle. The object is simple: take apart then put back together. The puzzle is created with two wooden parts locked together and the challenge is to separate them, by sliding and twisting, to solve. Adventurous and endlessly entertaining, this old-fashioned wooden puzzle will push your patience, wit, and creativity to the limits!
DIY Jigsaw Puzzle
Don’t be limited to store-bought puzzles for your next project. Make your own with your favorite family photos and any image you have in mind. Custom puzzles make a great gift, crafting project, party activity, or DIY souvenir of special travel photos. With a few pieces of cardboard and photocopies, you can make your own custom puzzle at home in just a few simple steps. This guide is easy to understand, therefore anyone can make the puzzle using this guide.
WOODEN Sliding Puzzle DIY

In the first step, you must cut out squares on the plywood, measure, mark, and glue the tiles. Use clamps to hold it in place and then continue. After gluing all the tiles together you must make finger holes in the wooden blocks to allow movement. Sandpaper the blocks after so that they are sanded smooth. Paint and then create a border for your puzzle and glue it up. Once it dries wax the pieces so that they may slide easily, and finally assemble!
Cube Eraser Puzzle
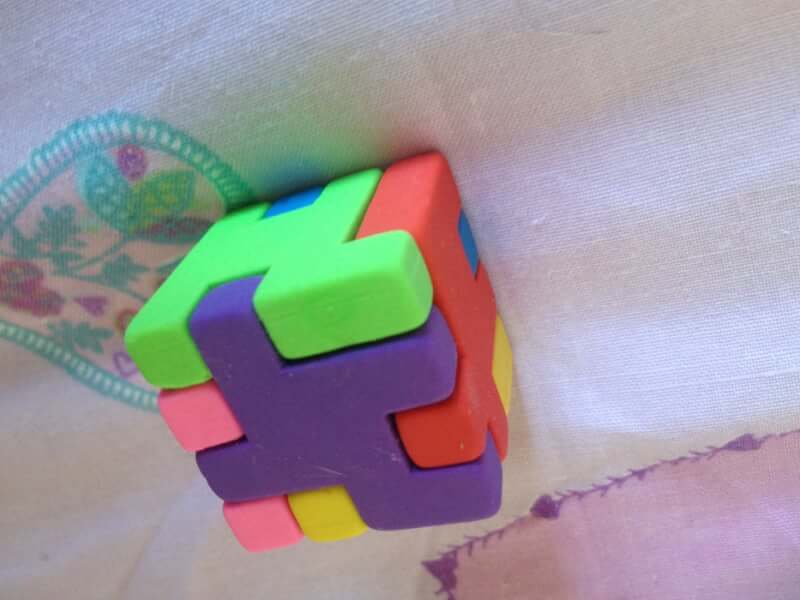
This DIY is really easy to make and looks great. Just take the Eraser Cube puzzle apart and put it back together again, like the old classic snake puzzle you did as a kid. The pieces are numbered from 1 to 6. After placing the number 2, on top of number 1, the next step will be placing the number 3 on top of the number 2 and so on. Then, the last step is to place the number 4 on top of 1.
Laser Cut Puzzle Picture
In this activity, you will create a unique puzzle by incorporating your own image into the product. You are given a blank canvas which you can design and make however you choose using your imagination and creativity. The only constraints are your own limits! Begin by collecting the materials Spray adhesive, MDF, picture, cloth, scissors, masking tape, and laser cutter.
Next, cut a section of your picture and attach it to MDF using spray adhesive. Load the laser cutting program on the desktop computer then do test cuts until you find the right settings for cutting through your specific material. Lastly, cut out the puzzle pieces, cool down your laser cutter safely, then go home with something fun to play with!
Voice-activated Interactive Puzzle
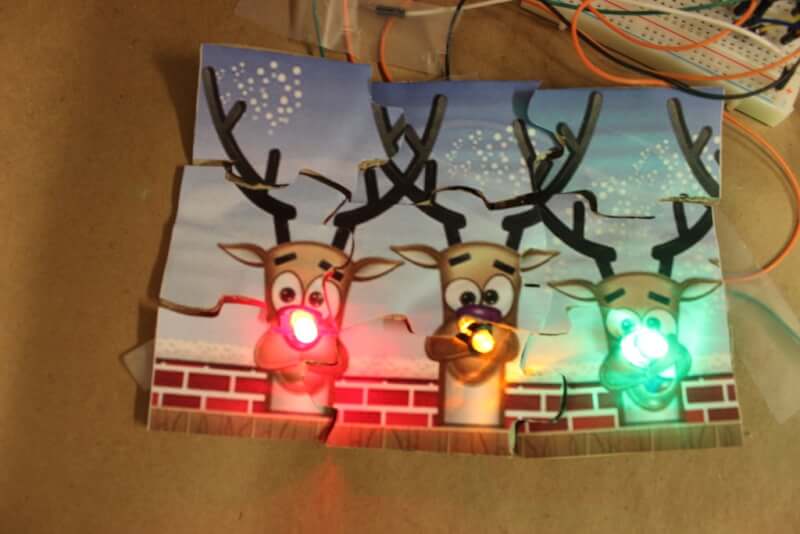
Make your own Puzzle using Voice-activated Arduino to bring it to life. This puzzle is great for beginners and teaches you how to code Arduino and use a breadboard to make a program, as well as soldering LEDs onto a cardboard surface. All you need is the Voice-activated Arduino, and the Puzzle's voice will guide you through the steps of creating your puzzle. With this guide, you'll be able to have fun while doing so. Be more creative and develop more skills!
Card Board Steampunk Puzzle Box

Train your brain by constructing a puzzle box for your friends and family out of cardboard. Before you begin, you will need cardboard, a cutting board, knife, hot glue gun, wood skewers, ruler, compass, pencil, hedge clippers, and screwdriver. Assemble the gears with your chosen pattern and construct the lockbox around them. Then build the second key mechanism and add it to the outer-most box. When complete you will have a great gift to give any puzzle fiend or engineer in your life.
Lego Puzzle Box
Lego is fun! Legos are incredibly versatile and can be used to create many different things. This video shows you how to build a beautiful puzzle box. Create your puzzle box by first building the center box section. Then create the lid, bottom, and side pieces of the box. Assemble each piece into a whole and then add the hinges to make your puzzle box function as one refined piece of craftsmanship. Perfect for holding little treasures.
Codex Puzzle Box

The Codex Puzzle Box is a beautiful wooden box that requires your patience and skill to build. Begin by cutting out the seven circles needed to make the inner chamber of the puzzle box. Then, assemble each circular section with screws drilled from the outside into each of these layers. Once complete, construct the outer columns and test fit all three before gluing them together. This puzzle box looks great whether it's on your shelves full or empty, but nobody will know what treasures are inside unless they solve the puzzle first.
Card Board Dinosaur Puzzle
To construct your puzzle, you need corrugated cardboard, cutter, 3D printer, stitching, and marker. First, make a template for your puzzle, and print it out. Then attach templates on the cardboard, and trace the templates with a marker. Next cut out the pieces with the cutter following the marked lines. After that join the puzzle pieces together with stitching. Finally, hang up the puzzle on the wall to have fun!
Tower of Hanoi Puzzle Game
The Tower of Hanoi is a classic puzzle that is notoriously difficult to solve. This step-by-step guide teaches you how to make your own based on the original concept. Includes all the materials and tools needed, as well as simple instructions for creating and solving your wooden version of the Tower of Hanoi puzzle game. Make your own with simple instructions and get ready to play!
Paper clips Puzzle

This paper clips puzzle DIY is a fun and easy project. You will use paper clips and pliers to construct this educational toy. It is suitable for kids who are 6 years and above. The puzzle helps to develop the imagination of your child through creative thinking, color perception, and creative expression. Paper Clips Puzzle DIY stimulates learning abilities in a fun manner. Your kid will create three-dimensional models from the constructor set out of paper clips.
52 Piece Burr Puzzle
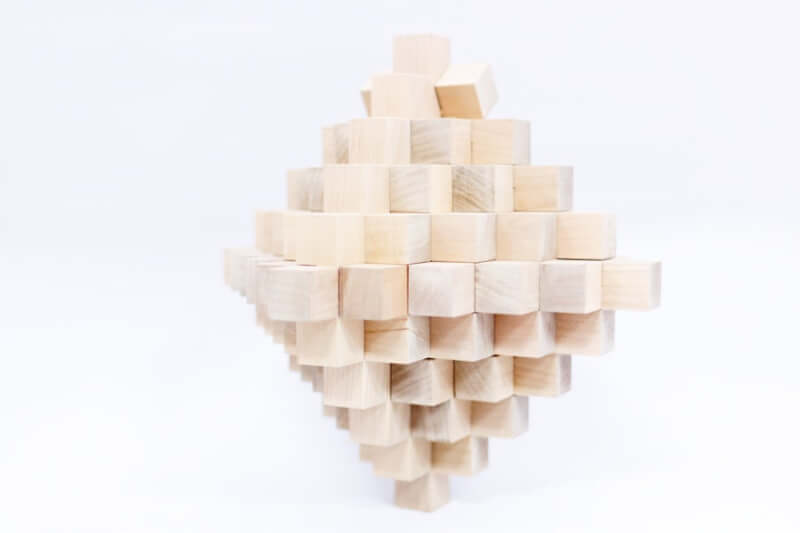
This is a great project for woodworking enthusiasts. You will be creating a 52-piece burr puzzle. You won't need any special equipment, just some saws and hand tools like a plane, hammer, chisels, and marking tools. Assemble the box pieces with lap joints from square slats that are cut to size. Then smooth the edges down with a plane or chisel and repeat 50 times! A simple, inexpensive project that’s fun to play with, gives out as gifts to family or friends.
Rope Puzzle DIY
Coming up with a rope as a puzzle requires basic material and equipment. This puzzle is ideal for kids. The requirement includes pencils, drill bits, wood, rope, wood beads, and glue among others. Measure the rope to the required length then pass the rope through the large bead. Pull the rope through the small bead then tie the rope and cut off the excess. Burn the rope ends to seal.
Piece Pen Puzzle Holder
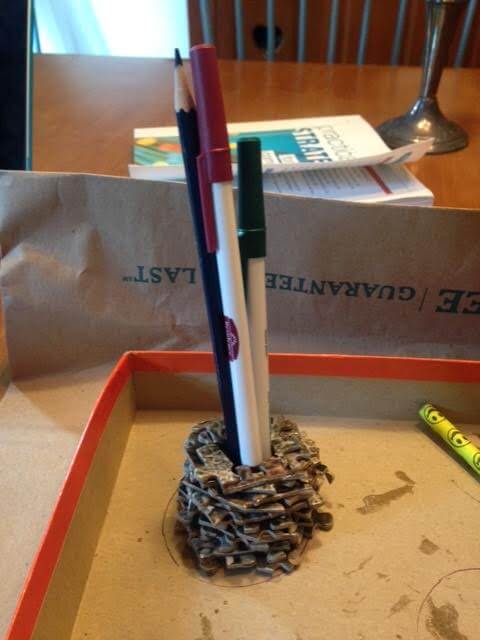
What do you get when you take a bunch of puzzle pieces, custom magnets, and a few months of failure tinged with just enough success to keep trying? You get this brilliant magnetized pen holder that you can build yourself. Because, as we all know, puzzles are good for the mind—and crazy projects that make your brain work overtime to solve them are even better. This pen holder also doubles as a tabletop game for about 10 to 15 minutes of brain-challenging fun.
Dolphin Puzzle
This DIY Dolphin Puzzle is a great at-home, fun activity that parents and children can do together. And learning how to make it is easy! It offers a great opportunity to use tools like the scroll saw, hand saw, and more. Also gives you a chance to practice your artistry by painting the dolphin plywood. Cut out two pieces of plywood in the dolphin’s shape, and then cut out the pattern. Smooth with wood glue, apply acrylic paint, let dry, and you’re done! Get started on yours today.
Concrete Cube Puzzle
Have you ever wanted to make your own concrete pieces? Then this DIY is for you! This is a fun, easy project that the whole family can get involved in. To begin this project, you will require cement, sandpaper, cardboard, a glue gun, and a printer. Start by creating a perfect cube using M-seal. Make cardboard molds and then add the cement mixture into them. Allow it time to set, then un-mold your cubes and sand them until smooth. Print template designs online or use freehand drawings, then stick the designs onto the cube faces with the glue gun and finish off by joining the cubes.